Tritone - Mahogany sports boat
The iconic mahogany boats by Carlo Riva exert a great fascination on every boat lover. It was clear to me early on that I wanted to build a sports boat in a precious wood look at some point and after completing the Skaði, I felt ready for this next step. I found a suitable model in the Aeronaut range. Without further ado, I purchased the "Classic" kit and started building my Riviera project. The kit has Aeronaut's usual high-quality finish and initial construction progress can be made quickly. As far as the construction is concerned, I wanted to stick to the building specifications, but the fittings and hardware should go beyond the scope of the kit


Not a reference but an inspiration, Riva boats made of mahogany and with plenty of chrome
The hull is built using a frame construction method and is easy to handle, although care should be taken not to damage the mahogany veneer when attaching the side panels. The stern tube, shaft and propeller are included in the kit, but I didn't want to use plastic parts for such an elegant model, so I gave it a high-quality shaft with a 3-blade brass propeller and spring clutch. No savings were made on the drive either; instead of the suggested brushed motor, a brushless outrunner is used in the fuselage so that the Tritone should glide quickly. For sealing purposes, the hull was covered with a layer of laminating fleece from the inside, unfortunately the epoxy resin did not want to harden completely and remained a little sticky (the process was new territory for me, in retrospect I would advise against using resin and hardener from the DIY store)

Elegant lines, the Tritone slowly takes shape
While the hull was being built, work began on the deck and the interior. The bench seat was covered with upholstery material and beige nappa leather. The deck has elegant two-tone planking and the dashboard is also visually enhanced by the metal instrument surround. The round instruments are later illuminated from behind, with an aluminum-lined box with three bright LEDs placed behind the dashboard. This device allows the light to shimmer evenly through the cockpit instruments. The lighting can be controlled via a free channel on the radio remote control.


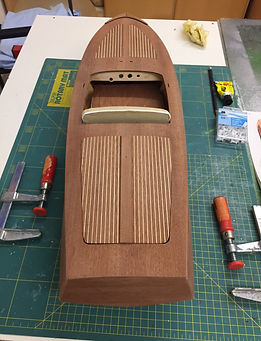
on the left the deck and the cockpit elements, on the right a view of the hull interior
The construction of this second model also broke new ground in terms of production technology. With the help of a self-made thermoforming box, fittings such as the classic bow lamp with the position lights are produced. For this purpose, a polystyrene plate is heated using a hot-air gun and pulled over a modeled positive mold using a frame, while a connected vacuum cleaner generates the necessary negative pressure. This process can be used to produce individual fitting parts such as fans, rear lights, tank nozzles and the like.

A box, a perforated plate and a standard sleeve for the vacuum cleaner, ready is the thermoforming box
Before the deck and hull were glued together, the latter was lined with balsa strips on the outer edge of the planking and sanded to match the curvature of the deck, thus enlarging the subsequent gluing surface and ensuring a clean connection between the two parts. After the deck was glued on, it was sanded flush with the hull. This step involved some work as the plan provides for a slight overhang of the deck and the parts are correspondingly large. The cover at the rear of the boat was created and also adapted to the curvature of the deck. The hull was filled and then the entire boat was sanded with increasing grain size and prepared for painting the underwater hull.


Deck and hull are joined and sanded, the Tritone before painting
Once the dashboard had been glued in place, the boat was actually ready for the paint work, but when the cockpit was fitted, the result was inconsistent. On the one hand, the bench seat was very far behind the steering wheel, on the other hand, the floor was much too close to the dashboard. The skipper would have to steer with his legs stretched out and bent far forward, a rather uncomfortable idea and not very visually appealing. For this reason, a rectangle was cut out at the front of the cockpit floor and lowered by inserting three 5 mm plywood walls to create a recessed footrest for the passengers. In order for the construction to fit inside the hull, recesses had to be milled at the height of the continuous frames. This was followed by painting the lower hull with white paint, which was then sealed with 2-component clear varnish. Now the mahogany surfaces could be treated. These were painted in layers with a brush using boat varnish with decreasing thinner. The hull was wet-sanded between each coat of varnish. Although this procedure is time-consuming, the result is impressive. A total of 8 coats of varnish have now been applied.


Painting with boat varnish is a painstaking job but results in a clean finish
After painting the underwater area in white, the painting work was basically complete. Now it was time to get down to the detailing. The cockpit of the Classic is constructed in such a way that you can see the frames and the planking on the inside, which are made of birch plywood and are not really pretty to look at. It was therefore decided to clad these side walls. For this purpose, wall panels were made from the remains of the mahogany veneer and the upper section was then covered with light blue leather. This color can also be found in the upholstery of the driver's seats. The original bench and the turquoise leather that came with it didn't appeal to me and were discarded. Instead, I opted for a combination of light blue and cream-white leather, into which I also sewed decorative strips. The new seat was lined with cleaning sponges and then covered. Further elements were added to the cockpit, such as the throttle levers. The installation of the electronics continued under the cover: the servo, receiver, controller and a switching module for the lighting elements found their place and were secured with a drop of hot glue. This ensures that nothing flies around when driving, but individual components can still be easily removed if necessary. The edge of the Classic between the deck and the side walls was fitted with an all-round chrome strip from an automotive supplier.


The new upholstery and the decorative strip add color accents. Fittings are gradually being added
In addition, the Tritone was given a decorative strip in the same shade of blue as the cockpit upholstery, as well as two dummy exhausts from the RC car market. The matching sound comes from an inexpensive sound module located behind the backrest of the seat and placed on the throttle channel. Although the sound comes from a diesel engine, it is a nice gimmick. The next step was to fit the cockpit window and add a chrome frame. Then it was the turn of the fittings: the cast parts supplied are unfortunately not very sturdy and not satisfactory in terms of quality, which is why I decided to make the parts myself. The drop-shaped cleats were made from polymer clay and wire, and the handle for the engine cover and fan were also made from modeling clay. The parts were then sanded, primed and then painted with Molotow Liquid Chrome to create a very realistic chrome finish.

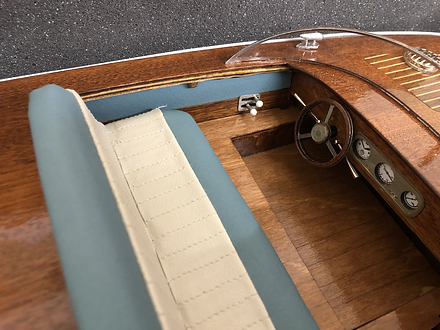
A first photo shoot after the successful installation of the cockpit windshield
The Tritone was gradually detailed further. A small wall panel with levers made of aluminum and two pins was added to the cockpit. A flagpole with a Swiss flag and functional stern and bow lamps were placed on the deck. The latter in particular turned out to be a real challenge: the basic housing was made from modeling clay and then produced as a plastic piece using the thermoforming technique, onto which a filigree aluminum tube coated with FIMO was then placed to hold the white top light. The colored position lights were then installed in the base housing itself. It took many attempts until both the shape was found and the finely filigree equipment was successfully accommodated in the workpiece. Finally, the bow light was glued to the deck and the cable routing was concealed in the stern area where all the electronics are located. Overall, the Tritone now has the following functions: Forward and reverse, rudder, proportional sound module, illumination of the cockpit fittings, as well as bow, stern and position lights.

On the left a view of the cockpit with the various fittings, on the right the Tritone in its matching transport box
A first test in the water showed that the motorization was not yet optimal for the desired sailing characteristics. The installed brushless drive had plenty of power but the RPM was too low to really bring the Tritone into a gliding mode. Without much hesitation, the motor was replaced: now there is an outrunner from the flight range with a higher speed in the hull, the difference is remarkable. At three-quarters throttle, the model now enters a clean glide phase and a nice speed without compromising the realistic sailing characteristics. The cornering response is sensitive and the Tritone turns beautifully, as you would expect from such a classic boat.
Building the Tritone required a lot of patience in places and at times the model lay untouched for long periods due to a lack of time or motivation. Model building takes patience and sometimes several attempts, so it's all the nicer when the model can finally be handed over to its element and you can feel that the effort was absolutely worth it when you sail it
